
The Banners of North York Lodge
Over the years, the North York Lodge has been represented by at least four different banners, three of which are still retained. The first banner, which was only recently rediscovered, bears the original Lodge number 876 in ornate gold lettering. It has been preserved by mounting it in a frame with protective glass, ensuring its survival for some years to come.
The most recent banner, currently hanging above the Worshipful Master’s chair, was crafted by Mrs King and is well documented in the Lodge’s 150th anniversary book. Unfortunately, its predecessor has been lost.
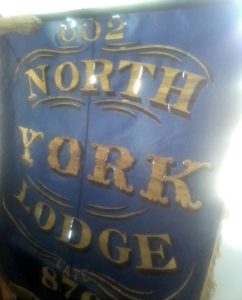
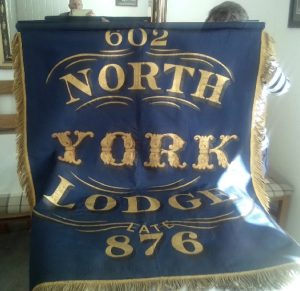
Another enduring banner, featuring a dark blue background with gold lettering and bearing the number 876, remains a significant part of the Lodge’s history. Although the precise date of its dedication is uncertain, it is believed to have occurred shortly after the Lodge’s number change in the 1880s. This assumption is based on the presence of the number 602 added to the top of the banner and the word “Late” positioned above 876. The banner was stored in the Lodge cupboard until approximately 2010, when it was removed and kept in WBro Cegla’s house for safekeeping. It was displayed during the 150th Anniversary meeting but suffered damage as its material became brittle and tears appeared around the lettering. Restoration was urgently needed.
Condition and Restoration Efforts
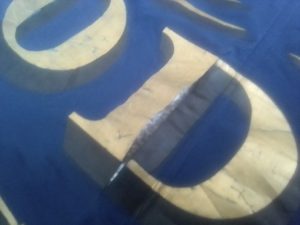
The passage of time inevitably affects even material objects, and without preservation, they too may eventually deteriorate. This was evident in the condition of the banner, with light visible through the material and tears forming around the lettering.
Seeking Professional Help
In 2020, an application was submitted to the BBC programme “The Repair Shop.” Photographs and a written account of the banner’s history were provided. The response indicated the application would be considered, but if no reply was received within two months, it would be unsuccessful. To date, no response has been received, perhaps because the banner did not evoke the same emotional resonance as other objects featured on the programme.
DIY Restoration Approach
 Having watched “The Repair Shop” for some time, useful tips were gathered on restoring paper and materials. Additional guidance was found on “YouTube,” with helpful videos demonstrating the repair of various objects. After consulting with Pamela, it was decided to undertake the restoration personally, selecting a straightforward approach.
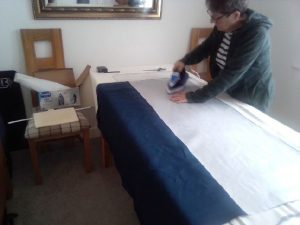
The banner’s material required strengthening and support to prevent further damage when rolled. It was decided to attach a backing material to the entire banner. Glue was chosen as the bonding method, covering the surface to repair existing tears and prevent new ones. Seamstress tutorials demonstrated the use of a “magic” paper for joining materials—one side was rough (the glue), the other smooth (paper backing).
Restoration Process
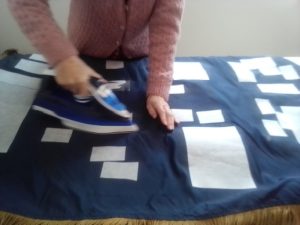
Tears in the banner were first covered with ‘Bondaweb’ paper, rough side down. Using a heated iron, the glue was melted onto the material. A backing material, chosen to closely match the original, was cut to size and hemmed with “wonder web”—a quick alternative to sewing—resulting in a neatly finished edge.
Once the backing material was prepared, it was covered with Bondaweb paper and ironed to activate the glue.
The banner itself was treated in the same manner. After cooling, the smooth backing paper could be removed, exposing the set glue and readying the surfaces for bonding.
 The Bondaweb backing paper was removed from both the banner and the backing material, leaving glue surfaces. The backing material was overlaid onto the banner and ironed, bonding the two layers together.
Conclusion and Preservation
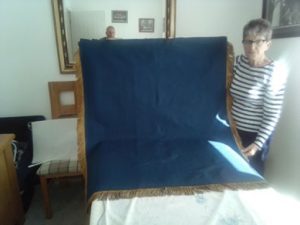
The finished banner, now with no visible tears, stands as a testament to the efforts of two amateurs. While the result may not be perfect, the restoration should ensure the banner’s preservation for years to come, provided it is stored correctly. The banner should not be folded, as creases may cause the lettering to flake off. It is recommended to cover the face of the banner with tissue paper, roll it onto a 100mm diameter cardboard tube, and store it in a carrying bag for safekeeping.
WBro Paul Cegla
(With due recognition and thanks to Mrs Pamela Cegla for her patience and undoubted skill).